


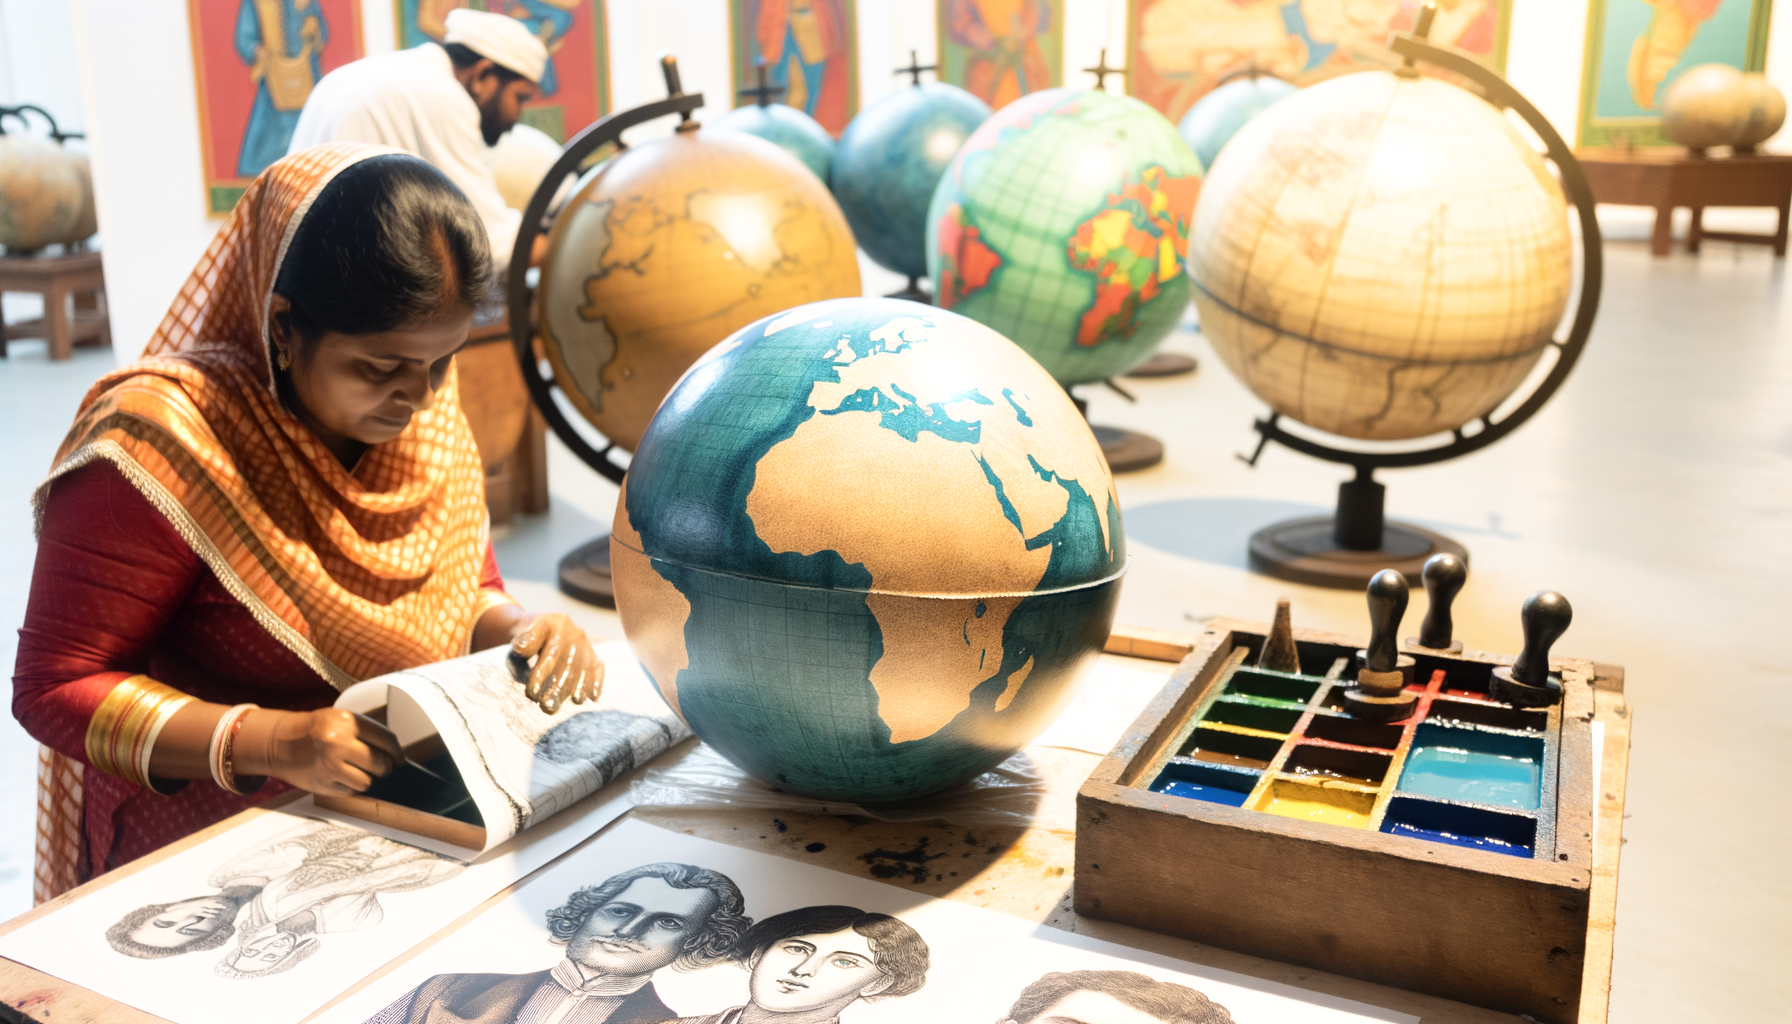
Globes are ubiquitous symbols of our planet, found in classrooms, libraries, and homes around the world. They offer a unique and tangible way to visualize the Earth's geography, presenting continents, oceans, and countries in their true spatial relationship. Yet, while we often take these spherical maps for granted, the journey from a flat piece of paper covered in ink to a perfectly formed, accurate sphere is a complex and fascinating process rooted in centuries of cartographic skill and manufacturing ingenuity.
Have you ever stopped to wonder how a two-dimensional map is transformed into a three-dimensional ball? How do the landmasses align so perfectly at the seams? The creation of a globe is a meticulous blend of art, science, and precision craftsmanship, a challenge that has evolved over time with advancements in printing and materials technology. This post will take you behind the scenes to uncover the intricate steps involved in printing and constructing globes, revealing the skill and dedication required to bring the world to your fingertips.
Our journey will cover the essential phases: from the initial cartographic design and the specialized printing techniques used, to the construction of the sphere itself, the crucial process of applying the printed map gores, and finally, the detailed finishing touches that complete the final product. By the end, you will gain a deep appreciation for the complex manufacturing process that transforms flat data into the spherical representation of our planet we know and trust. Understanding this process offers a new perspective on the familiar object and highlights the enduring value of tangible cartography in a digital age.
The Art and Science Behind the Sphere
The creation of a globe is not merely an act of manufacturing; it is a continuation of the ancient art of cartography combined with modern engineering. For centuries, mapmakers have grappled with the fundamental challenge of representing a spherical surface on a flat plane, a process that inevitably involves distortion. Globes circumvent this problem by offering a true-to-scale model of the Earth's shape, maintaining accurate spatial relationships between geographical features.
From the earliest celestial and terrestrial spheres created by ancient civilizations, globes have served as vital tools for navigation, education, and understanding our place in the cosmos. While technology has provided digital alternatives, the physical globe remains a powerful educational aid, allowing for hands-on exploration of geography in a way screens cannot fully replicate. The process of making one is a testament to human ingenuity in overcoming complex geometrical challenges.
A Brief History of Globes
The oldest surviving terrestrial globe, known as the Erdapfel, was created by Martin Behaim in 1492, pre-dating Christopher Columbus's arrival in the Americas. Early globes were painstakingly handcrafted, with maps drawn or painted onto prepared spheres. This was a time-consuming and expensive process, making globes rare and prized possessions, primarily accessible to royalty, scholars, and wealthy merchants.
The invention of printing revolutionized mapmaking and eventually globe production. Techniques like copperplate engraving allowed for maps to be reproduced more easily. Globe makers began printing segments of maps – specialized shapes called gores – which could then be carefully applied to a sphere. This innovation made globes more accessible, though they remained significant investments due to the intricate hand-assembly required.
Why Globes Still Matter Today
In an era dominated by digital maps and GPS, one might question the relevance of physical globes. However, globes offer unique benefits that digital interfaces struggle to replicate. They provide an immediate, undistorted view of the entire planet's surface, allowing for intuitive understanding of distances, sizes, and relative positions of continents and oceans.
Globes are particularly valuable in educational settings, helping students grasp geographical concepts like latitude, longitude, time zones, and the true scale of the Earth. They offer a tactile experience that engages different learning pathways. Furthermore, a beautifully crafted globe can be a striking decorative or collectible item, blending aesthetic appeal with intellectual value.
Phase 1: The Cartographic Canvas - Creating the Map
The journey of a globe begins not with a sphere, but with a flat map. However, creating a map specifically for a globe is far more complex than designing a standard flat map. The challenge lies in transforming the spherical geography into a set of shapes that can be printed on a flat surface and then accurately applied back onto a sphere without significant distortion.
This initial phase requires skilled cartographers who understand the unique requirements of globe production. Every line, label, and geographical feature must be meticulously planned and designed with the final three-dimensional form in mind. The data used must be accurate and up-to-date, reflecting current geopolitical boundaries and physical geography.
Initial Data and Design
Modern globe manufacturing utilizes vast digital databases of geographical information. This data includes coastlines, country borders, cities, rivers, mountains, and ocean depths. Cartographers work with this data using specialized software to design the map layout. The design process involves selecting the level of detail appropriate for the globe's size and intended purpose, ensuring readability and clarity.
Decisions are made about color schemes, typography, and the inclusion of thematic information like ocean currents or shipping lanes. The design must be visually appealing and highly functional. This digital master map serves as the blueprint for everything that follows, requiring careful verification for accuracy before moving to the next stage.
Projection and Distortions: The Gore Challenge
Mapping a sphere onto a flat surface inherently causes distortion. Different map projections minimize certain types of distortion (area, shape, distance, direction) at the expense of others. For globes, the goal is to create map segments that, when assembled on a sphere, result in minimal distortion across the entire surface.
The solution used for centuries is the creation of "gores." Gores are curved, spindle-shaped strips of paper that are wider at the equator and narrow to a point at the poles. Imagine peeling an orange in vertical segments; these segments are roughly analogous to globe gores. Using multiple gores – typically 12 or 18 for a standard globe – allows the curved surface of the Earth to be represented on flat strips with distortions managed primarily along the seams.
The number of gores used impacts the size of the distortion on each strip and the number of seams on the final globe. Fewer, wider gores have more curvature and potentially more internal distortion before application, while more, narrower gores have less internal distortion but result in more seams to align. Cartographers must precisely calculate the shape of each gore strip so that when they are applied to a perfect sphere, they meet seamlessly and accurately depict the Earth's surface.
Designing the Gore Strips
The design of the individual gore strips is a critical step derived from the master map. Using mathematical calculations based on the globe's precise diameter, the cartographic software warps the flat map data into the specific curved shape required for each gore. Features near the edges of the gore are compressed or stretched slightly in the digital design phase to account for how the paper will curve when applied to the sphere.
Each gore must align perfectly with its neighbors at the longitudinal seams and must meet accurately with all other gores at the poles. This requires incredibly precise design and layout. Labels for countries, cities, and features that span across multiple gores must be carefully positioned so they appear continuous and legible on the finished sphere. This phase requires not only cartographic skill but also a keen understanding of the three-dimensional application process.
Phase 2: The Printing Process - Bringing the Map to Paper
Once the digital design for the gores is finalized, the next step is to transfer this intricate cartography onto a physical medium. The printing process for globe gores is highly specialized, requiring precision to ensure that the fine details of the map are accurately reproduced and that the colors are consistent across all gores. The quality of the paper and the inks used is paramount, as they must withstand handling during the application process and remain vibrant over the lifetime of the globe.
Traditional printing methods, like offset lithography, are often favored for their ability to produce high-resolution, consistent color printing on demanding paper stocks. However, digital printing is increasingly being used, especially for smaller runs or custom designs, offering flexibility and speed. Regardless of the method, maintaining exact registration – ensuring that different color plates or digital passes align perfectly – is crucial for a crisp and accurate map.
Choosing the Right Paper and Ink
The paper used for globe gores is not standard printing paper. It must be strong enough to withstand being wetted and stretched slightly during the application process without tearing or disintegrating. It also needs to be flexible enough to curve smoothly around the sphere without creasing or bubbling. Often, a special, durable paper stock is chosen, sometimes treated or coated to enhance its properties.
Inks must be lightfast to prevent fading over time when exposed to light. They also need to adhere well to the paper and potentially to subsequent layers of varnish or lacquer. Achieving accurate and consistent colors, particularly for distinguishing between different countries or depicting variations in elevation or ocean depth, is vital for the globe's educational and visual quality. Color calibration is a rigorous part of the printing setup.
High-Precision Printing Methods
Offset printing is a common method for high-volume globe gore production. It involves transferring the inked image from a plate to a rubber blanket and then onto the paper. This indirect method produces sharp images and allows for excellent control over color consistency across large print runs. Each color layer (cyan, magenta, yellow, black, and sometimes spot colors) is printed separately, requiring precise alignment, known as registration.
Digital printing offers advantages for shorter runs or when personalized content is required. High-resolution digital printers can print the entire gore design in one pass, simplifying the color registration challenge, though achieving the same level of archival quality and paper handling can sometimes be a consideration. The choice of printing method often depends on the scale of production and the specific requirements of the globe design.
Ensuring Color Accuracy and Detail
Consistency is key in printing globe gores. The colors must be uniform across all the gores that will form a single globe. Variations in color can make the assembled globe look patchy or inaccurate. Printing presses are carefully calibrated, and color proofs are meticulously checked against standards to ensure fidelity to the original design. Fine details, such as small islands, city dots, and lines of latitude and longitude, must be rendered sharply and clearly.
The clarity of text labels is also essential. Place names need to be legible, even at small font sizes, which requires precise ink application and paper that does not bleed. The quality achieved in this printing phase directly impacts the final appearance and usefulness of the finished globe. It is a step where meticulous quality control prevents imperfections that would be obvious once the gores are applied to the sphere.
Cutting the Gore Strips
Once printed, the gore strips must be cut out with extreme precision. Any deviation from the designed shape will make it difficult, if not impossible, to align the gores correctly on the sphere. Traditional methods involved skilled workers using dies and presses, or even hand-cutting. Modern production utilizes automated cutting machines, often laser or digital die cutters, which can follow the complex, curved outline of the gore with high accuracy.
The cutting process also prepares the edges of the gores for application. Sometimes, edges are beveled or specially treated to help create a smooth, nearly invisible seam when the gores are joined on the sphere. The stack of perfectly cut gore strips is now ready for the next, perhaps most challenging, phase: the construction of the sphere and the delicate application of the cartography.
Phase 3: Sphere Construction - Building the Ball
While the map gores are being printed and cut, the spherical core of the globe is manufactured. This core provides the rigid structure onto which the printed map will be applied. The materials and construction methods used for the sphere vary depending on the size, intended use, and quality level of the globe. The goal is always to create a perfectly smooth, perfectly spherical surface that provides a stable base for the cartography.
Common materials include cardboard, plastic, and sometimes even metal for very large or high-end globes. The construction method must ensure uniformity in shape and weight distribution. Any irregularities in the sphere's surface will translate into wrinkles, bubbles, or misalignments when the paper gores are applied. Therefore, precision in sphere manufacturing is just as critical as precision in map printing.
Materials for the Core
For many standard globes, the sphere is made from compressed paperboard or cardboard. Layers of paper and adhesive are formed and hardened into a rigid shell. This material is relatively lightweight and cost-effective, making it suitable for mass production. Higher quality or more durable globes might use thermoplastic polymers, which can be molded into precise spherical halves.
Some traditional or very large globes might use materials like wood, metal, or fiberglass. The choice of material influences the globe's weight, durability, and cost. The surface of the sphere, regardless of the underlying material, needs to be smooth and ready to accept adhesive for the map gores. Any seams or imperfections in the core must be smoothed down before application begins.
Forming the Sphere
Cardboard spheres are often constructed by winding strips of paperboard and adhesive around a mold, gradually building up layers until the desired thickness and rigidity are achieved. Another method involves pressing pre-cut, shaped pieces of paperboard onto a form. Once dry and hardened, the sphere is removed from the mold.
Plastic spheres are typically made by injection molding or rotational molding of thermoplastic pellets. This process allows for the creation of seamless or two-part spheres with high consistency. The two halves of a plastic sphere are then joined together precisely to form the complete ball. Quality control checks are performed to ensure the spheres are perfectly round and free of defects.
Reinforcement and Finishing the Core
Depending on the construction method, the sphere might undergo further processes to enhance its strength and prepare its surface. Seams on molded halves are carefully smoothed. The entire outer surface is often coated with a primer or a thin layer of material to create a uniform, non-porous base. This layer ensures that the adhesive used for the gores will bond consistently across the entire surface.
For illuminated globes, the sphere must be translucent and house a light fitting. This requires different materials and construction methods, often involving clear or frosted plastic. Internal supports might be added to hold the light bulb or LED assembly in place. Creating a sphere that is both strong enough to hold its shape and uniform enough in thickness for even illumination is an added complexity in the manufacturing process.
Phase 4: Applying the Cartography - The Crucial Step
This phase is where the flat printed gores are transformed into the spherical map, and it is arguably the most skilled and labor-intensive part of globe manufacturing. Applying the gores requires immense patience, precision, and a delicate touch. Any error in alignment, smoothing, or tension can result in a distorted map, visible wrinkles, or misaligned geographical features. It is here that traditional craftsmanship often plays a significant role, even in modern factories.
The gores are applied one by one to the sphere's surface. They are typically wetted before application to make the paper more pliable and easier to stretch and shape around the curves. This "wet application" method allows for subtle manipulation of the paper to ensure a smooth fit and accurate alignment. The adhesive must be strong enough to bond the paper permanently to the sphere but also allow for slight adjustments during the application process before it sets.
The Wet Application Method
Each printed gore strip is usually soaked in water for a specific amount of time or moistened with a damp cloth. This softens the paper fibers, making the paper temporarily expandable and flexible. The excess water is blotted off, and adhesive is then applied to the back of the gore. The type of adhesive used is carefully selected; it must provide a strong bond, be compatible with the paper and sphere material, and not cause the ink to run or fade.
The wet paper gores are then carefully positioned onto the sphere, usually starting along the equator or a prime meridian line for the first gore. The moisture allows the paper to be stretched and molded slightly to conform to the sphere's curvature. As the paper dries, it shrinks back slightly, pulling taut against the sphere and the adhesive, which helps create a smooth surface.
Aligning the Gores - Precision is Key
This is where the skill of the craftsperson is most evident. The first gore is placed carefully, aligning its central axis or edge with a reference line on the sphere. Subsequent gores are then applied, one by one, with their edges carefully butted up against or slightly overlapping the edges of the previously applied gore. The key challenge is to ensure that the geographical features align perfectly across the seams where two gores meet.
Latitude and longitude lines printed on the gores serve as crucial guides for alignment. The craftsperson must constantly check that these lines form continuous circles around the globe and that landmasses and borders flow smoothly from one gore to the next. This requires a keen eye and steady hands. Misalignments of even a millimeter at the gore edges can become noticeable geographical errors on the finished globe, particularly near the equator where the gores are widest.
Smoothing and Adhering
As each gore is positioned, it is carefully smoothed down onto the sphere, working outwards from the center of the strip towards the edges. Specialized tools, such as soft brushes, rollers, or cloths, are used to gently press the paper onto the adhesive, pushing out any trapped air bubbles and smoothing away wrinkles. The goal is to achieve complete contact between the wet paper, the adhesive, and the sphere's surface.
This process requires applying just the right amount of pressure – enough to ensure adhesion and smoothness but not so much as to tear the delicate wet paper or distort the map details. The craftsperson works methodically around the sphere, applying and smoothing each gore until the entire sphere is covered, culminating at the poles where the pointed ends of all the gores meet. The pole areas are particularly tricky, requiring careful manipulation of the paper points.
Trimming Excess Paper
Once all the gores are applied and smoothed, there might be a small amount of excess paper at the poles where the gore tips converge, or along the equator if a specific construction method was used. This excess is carefully trimmed away using a sharp blade. Precision is essential here to create a clean finish at the poles and ensure that any joining of hemispheric maps along the equator is seamless.
The trimmed edges and the gore seams are then often pressed down further to ensure a tight bond and minimize their visibility. The sphere is then set aside to allow the adhesive to fully dry and cure, a process that can take several hours, during which the paper shrinks slightly and becomes taut. This creates the smooth, hard surface ready for the final finishing steps.
Phase 5: Adding the Details and Finishing Touches
With the map successfully applied and the adhesive dried, the globe is beginning to look like the finished product, but several important steps remain to protect the cartography, add functionality, and enhance its appearance. These finishing touches involve applying protective coatings, attaching the necessary hardware like the meridian ring and stand, and ensuring the globe is accurately calibrated. This stage adds durability and usability to the finished sphere.
The goal of the finishing process is to make the globe durable, easy to handle, and aesthetically pleasing. It transforms the paper-covered sphere into a robust and functional geographical tool or a beautiful piece of decor. Each step requires care and attention to detail to maintain the quality achieved in the previous phases.
Lacquering or Varnishing
To protect the printed map from dirt, moisture, and abrasion, the surface of the globe is typically coated with several layers of lacquer or varnish. This clear coating also enhances the colors of the map and gives the globe its characteristic smooth, glossy, or matte finish. The type of coating used depends on the desired look and durability.
The lacquer or varnish is applied carefully and evenly across the entire surface, often by spraying or using specialized rollers. Multiple coats are usually applied, with drying time in between layers. This process seals the paper gores and makes the surface easy to wipe clean. For illuminated globes, the coating must also be heat-resistant and allow light to pass through evenly.
Adding the Meridian Ring and Stand
Most globes are mounted on a stand that includes a meridian ring. The meridian ring is a calibrated circle, often made of metal or plastic, that encircles the globe and is marked with degrees of latitude. It allows the globe to be rotated along its axis (representing the Earth's rotation) and tilted at the correct angle relative to its stand (representing the Earth's axial tilt).
The globe sphere is attached to the meridian ring at its poles via pins or other fixtures. The meridian ring is then mounted onto a base or stand, which can be made from various materials like wood, metal, or plastic. The design of the stand affects the globe's stability and aesthetic. For desk globes, a simple weighted base is common, while floor globes might have more elaborate stands.
Calibration and Quality Control
Before a globe is considered complete, it undergoes final calibration and quality control checks. This involves verifying that the globe spins freely on its axis and that the meridian ring is correctly aligned and marked. More importantly, the accuracy of the cartography is checked once more on the finished sphere.
Points of reference, such as major cities or geographical landmarks, are checked against their actual coordinates and their corresponding marks on the meridian and equatorial lines. Any significant misalignments resulting from the application process would ideally be caught at this stage, although major flaws are usually avoided by the skilled application process itself. The final globe is inspected for surface defects, color consistency, and overall finish quality.
Illumination (For Light-Up Globes)
For globes designed to be illuminated, an internal light source is installed before the sphere is sealed or during the assembly of the two halves. This light source, typically a low-heat incandescent bulb or an LED, shines through the translucent gore paper and sphere material. When lit, these globes can reveal additional thematic mapping, such as physical geography (showing elevation and ocean depth with light and shadow) which might be subtly printed or invisible when the light is off.
The electrical components are safely integrated into the base or stand, with a cord and switch for operation. The translucent paper and coatings must be specifically chosen to transmit light effectively and safely. Illuminated globes add an extra layer of functionality and visual appeal, allowing for different geographical features to be highlighted and explored.
Modern Innovations in Globe Making
While the fundamental process of applying printed gores to a sphere remains central to traditional globe manufacturing, modern technology has introduced innovations that enhance accuracy, efficiency, and design possibilities. Digital tools have revolutionized the initial stages of the process, and new materials offer improved durability and features. These advancements help keep the craft relevant in the 21st century.
The integration of computer-aided design and manufacturing processes has streamlined several steps, though the manual skill required for gore application persists as a defining characteristic of quality globe production. Technology complements the traditional craft, making possible more detailed maps and diverse globe products than ever before.
Digital Mapping and Design
Today, cartographers use sophisticated GIS (Geographic Information System) software to create highly detailed and accurate digital maps. This allows for easier updates to reflect geopolitical changes or new geographical data. The transformation of this data into precise gore shapes is also handled by specialized software, ensuring mathematical accuracy before printing begins.
Digital design tools enable complex visual effects, such as intricate shading for physical relief or thematic overlays. They also facilitate the creation of maps in multiple languages or with customized content. This digital precision at the design stage is crucial for the successful physical assembly that follows.
Automated Processes
While the application of gores often still involves significant manual dexterity, some aspects of globe manufacturing have been automated. Automated cutting machines ensure highly accurate gore shapes. Sphere forming, particularly with plastic molding, is largely an automated process. Printing presses are highly automated, ensuring consistency and speed.
However, the core task of wetting, positioning, aligning, and smoothing the paper gores onto the sphere remains difficult to fully automate due to the pliable nature of the wet paper and the need for subtle adjustments. Some manufacturers may use jigs or robotic arms to assist in positioning, but the final smoothing and alignment often relies on human judgment and skill. The blend of automation and manual craft defines many modern globe factories.
New Materials
Developments in plastics and coatings have improved the durability and appearance of globes. UV-resistant inks and coatings help prevent fading, while stronger, lighter sphere materials are available. For illuminated globes, energy-efficient LED lighting provides bright, cool illumination that lasts longer than traditional bulbs.
Some manufacturers are also exploring more sustainable materials for both the sphere and the stand. These new materials contribute to the longevity and quality of the final product, ensuring that globes can be enjoyed for many years. The evolution of materials continues to shape the possibilities for globe design and production.
The Enduring Skill of the Craftsperson
Despite the incorporation of modern technology, the creation of a high-quality globe remains a testament to human skill and dedication. The most critical phase, the application of the printed gores to the sphere, is a craft that requires years to master. It is a process that demands precision, patience, and an intimate understanding of how the paper will behave when wet and dried.
The ability to perfectly align numerous curved strips of paper onto a three-dimensional surface, ensuring that geographical features meet seamlessly at every join, is a highly specialized skill. The craftsperson's eye for detail and steady hand are irreplaceable in achieving the smooth, accurate surface expected of a quality globe. This human element is what elevates globe making beyond mere manufacturing; it is an artisanal process.
Each globe passes through skilled hands that meticulously shape the paper, smooth out imperfections, and ensure the world is accurately represented on its spherical form. This blend of advanced technology in design and printing with traditional handcraft in assembly is what makes a globe such a unique and valuable object. It is a product where the touch of the artisan is still evident in the final piece.
Conclusion
The seemingly simple globe sitting on a desk is, in fact, the result of a complex and fascinating manufacturing process that marries advanced technology with traditional craftsmanship. From the initial challenge of projecting a sphere onto flat gores and printing with meticulous precision, to constructing the perfect sphere and skillfully applying the wetted map strips, each step is vital to creating an accurate and beautiful representation of our planet.
The journey from a flat map to a three-dimensional world involves cartographers, printers, engineers, and skilled artisans working in concert. Understanding this intricate process reveals the hidden complexity and dedication behind an object we often take for granted. It highlights the ingenious solutions developed over centuries to solve the problem of mapping a sphere and the enduring value of physical models in visualizing our world.
The next time you spin a globe, take a moment to appreciate the incredible journey it made to reach you. Look closely at the perfectly aligned seams, the vibrant colors, and the smooth surface. Recognize the layers of design, printing expertise, engineering, and handcraft that came together to place the world literally at your fingertips. The globe is more than just a map; it is a masterpiece of applied art and science, a tangible connection to the geography of our amazing planet.